Sunday, October 19, 2008

Canon S110X review: real-world test photos

In this series of pictures I show how well the Canon S110X Superzoom camera performs in real-world situations. 


This picture shows a close-up of a Lego robot. The light level was moderate, and I kept the ISO low (200), and took several pictures, saving the least blurry. If you click on the picture for a full sized image, you'll see that there's still some CCD noise in the image, but very little.


This picture was taken in outside a dramatically lit storefront, at night. Even though the ISO was inly 200, it came out with very little blur, or noise.


This picture was taken on an somewhat overcast day. The color is pretty accurate.


The camera did a good job of capturing this shot, impressive given the wide dynamic range. I had to tweak the exposure a little, using the manual mode of the camera, to get it to come out looking this good.


This sunset shot looks nice enough on my computer screen, but it doesn't really capture the colors as they were in person. This is a problem for most cameras, to be fair. Note that this was taken from a moving car, but is relatively blur-free.


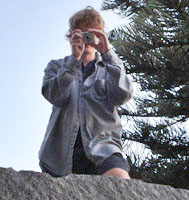
This portrait shot shows good color balance and a nice depth of field effect (The face is in focus while the background is not. To get this effect I stood relatively far from my subject and then used the 10x lens to zoom in on the face).


The colors came out really nicely in this foggy day photo.


Another sunny day shot, showing that in full automatic mode the camera does a reasonable job of exposure, but still somewhat clipped.


This photo was taken in full manual mode (the focus was set automatically, but the exposure and F stop were set by hand). This is great fun to play around with, but time consuming, and not without risk. This picture was taken on a sunny day, but manages to look overcast. To be fair, it was one of the first pictures I took using full manual mode. The moral here is that full manual mode is a nice feature, but it will take some time to get good with it.


I took this picture late in the evening at a local mall. What with people moving around, it was very hard to get a low-blur image, without cranking the ISO way up. Instead I used the burst mode on the camera and just took 10 pictures in quick succession. After downloading the photos from the camera I could quickly pick through the set and find the clearest, most pleasing photo, which is this one. Many of the others were also reasonably sharp, but some where quite blurry. Image stabilization can make your pictures sharper, but it can't make moving people stand still!


This post is part of a series that reviews the Canon SX110IS.

Thursday, September 25, 2008

A1000IS : part of the new Canon powershot lineup

Canon has 3 fairly compelling cameras out right now in the compact/ultracompact form factor.  First up: the A1000IS ($200 at amazon). 

The A1000IS is the most compact AA-using camera
 Canon has ever made, at 3.8 x 2.5 x 1.2. For comparison, the proprietary battery using SD850 of last year is 3.6 x 2.2 x 1 in.  The extra thickness is due to the bulge on the side of the camera where the batteries go. It's quite pocket friendly, and the bulge makes it much nicer to hold while taking pictures than the SD850 was. The specs of the A1000IS are also quite nice: 4x
 optical zoom, optical image stabilization, 2.5in LCD (115k pixels), optical viewfinder, and more megapixels than you'll ever need (10!). With disposable AA batteries, Cannon claims you can take 220 pictures per charge, with the LCD on (no specs published with the LCD off, unfortunately). You can also get rechargeable NIMH batteries, which will net you 450 shots per charge. It's really nice to have the choice. I'd go for the NIMH batteries, with the piece of mind that if I ever need backup batteries I can always buy some standard AAs.

My hands-on experience with the camera is quite limited. As I said before, it's quite comfortable to hold, and rests in your hands easily without having to grip tightly. All the buttons are easy to push, and are reasonably tactile (though not as much as the supremely satisfying buttons on the SD1100) . The zoom is also easy to operate. Disappointingly, however, the mode dial is very, very tight. There's no way you could turn it with one finger, and even using two fingers it's some work.  While I appreciate the fact that it won't get turned by mistake, I think they went overboard. 

I haven't played with it enough to judge the optics quality, but I expect it's up to the high Canon standard. 

At $200, it's quite a camera. There are, however, several other cameras from Canon at that price range worth considering. The SD1100IS is significantly smaller, but has a smaller zoom, and goes for $171.  The older SD850IS is a bit smaller, but has the same zoom, for $220. And, if you are on a really tight budget, the A590IS is a bit larger, has the same zoom, and is only $125

Tuesday, August 26, 2008

Inside the SD110 - part 3: underside of the mainboard

(Jump to the previous post in series.)

In this shot you can see the other side of the mainboard. Again there are several ICs, the most interesting being the DIGIC IC (version II). This is the main chip that Canon produces, and gives the camera it's personality. This chip incudes several functional parts, according to wikipedia; a general purpose CPU (a 32 bit RISC cpu made by ARM), a video controller and a still picture controller. The code running on this chip provides all of the interface that you see when you use the camera, as well as all the video and image processing when you take a photo or record a movie. Interestily, the DIGIC II was used by a huge range of cannon cameras from the high-end EOS20 to the lowly SD110, and even fairly recent models such as the SD700. All modern Canon cameras in production, however, use the newer DIGIC III.

Saturday, May 17, 2008

Canon PowerShot SD890 IS and SD850IS compared

Canon has released a lot of new cameras since my last post. Today I'll discuss the SD890, which appears to be an update to the SD850. Like it's predecessor, it has a 2.5" LCD, an optical viewfinder, and image stabilization. The Sd890's major improvement over the older camera is that it features a 5x optical zoom. That's the highest zoom I've heard of in a compact camera. Unfortunately, Canon did have to make the camera slightly larger in every dimension, at 3.8 x 2.3 x 1.1 in (vs 3.6 x 2.2 x 1 in. for the sd850). The SD850 is already about as big as I'm willing to carry around in a pocket, so for my money I'd go for the SD850 instead (which is only $240, vs $350 for the SD890). An interesting side note is that the SD850's price hasn't dropped much from when I bought it, 5 months ago, at $250.

The only other advantage to the SD890 is the shots (CPIA) per charge is better: 320 (vs 240). With the LCD off it goes up to 800!

So far I've only found one review. They found the ergonomics surprisingly poor: not easy to hold, and difficult to navigate between pictures. I hope to put my hands on on one soon, and post my own review. They also found that at the widest setting, the lens was rather distorted, and produced photos with blurry corners (see ttp://www.digitalcamerareview.com/assets/17135.jpg). Given the higher zoom of this lens, it's not surprising, and likely it's worse than for the SD850, though there are not enough sample pics out there to be able to judge this yet. The only real positive I found in this review is that the noise level at ISO 800 is notably better than on the SD850. That's at least something.

Oh, and did I mention that it's a 10 megapixel camera (up from 8MP on the SD850)? But who cares, these days, about the mega pixel rating?

Sunday, May 4, 2008

Innovating at the color filter level

As I've discussed before, the way your camera produces color images is by placing a color filter over what is essentially a monochrome sensor. The redness of a particular pixel, for instance, depends on how much light passed through the red filter above the nearest CCD element to that pixel. The big disadvantage is that the filter must discard a lot of the light entering the lens. I never thought about it before, but apparently there exist many different possible color filter layouts, with different advantages and disadvantages.

http://www.quadibloc.com/other/cfaint.htm
has some really nice examples of the possible trade-offs.

Hack your PowerShot camera's firmware

I just found this amazing website where several camera enthusiasts have figured out how to hack the firmware for the Canon PowerShot cameras (most cameras from the last few years are supported, and many recent models are supported). The hacks range from the mildly useful, such as live histograms, to the amazing, such as enabling 1/10,000th of a second exposures. Also particularly notable is the added ability to save pictures in RAW mode.

http://chdk.wikia.com/wiki/Main_Page

In particular, check out the high-speed photography pictures.

I'm going to try this out my SD850 soon. In the mean time, I encourage PowerShot owners to give it try, as the firmware hacks are non-destructive; you have to enable them each time you turn on the camera, so there's no risk to giving them a try.

Sunday, April 27, 2008

Inside the SD110 - 2nd step: the mainboard

(Jump to previous post in series.)

Just like in your computer, the SD110 has a mainboard where most of the logic chips and main CPU are placed. It's quite easy to get to; just pop the outside case off and there it is, under a layer of copper shielding, shown folded back to the left side of the picture. At this stage you can see several interesting features of the camera. First, many of the components are made by other companies, such as the two ICs in view, one from NEC and one from SAMSUNG.
Second, note how many ribbon cables there are on this card. While this may be the mainboard, there are a huge number of axillary boards, which you will see in later pictures. These boards are all attached with ribbon cables, which turn out to be relatively easy to remove and re-insert. Finally, note the ribbon cable on the lower-right, with the many silver dots. While it's not terribly clear, I suspect this is actually a testing port. The idea is that you could slip the whole thing into a connector and interface directly with the camera while it is apart. While this might be for repairmen to diagnose a problem with a camera that has been sent back for repair, another possible use is to test camera components while the whole thing is being assembled.

(jump to the next post in this series)